Yesterday I wanted to do some easy sewing; something quick and simple but something that would also be useful. With braxton hicks and baby kicks taking up pretty much every waking moment (and waking me up!) it was always going to be baby related.
I’d always planned on making a blanket for the baby as they’re one of those things you can never have too many of. We have them strewn around the house and in the car when Boy was small and I doubt this time around it’ll be any different. In fact I ordered the fabric from Plush Addict months ago, pre-washed it and then… Nothing. I guess I got this weird idea into my head about tempting fate and all that, so it just sat there.
Until yesterday, when I used Jane’s tutorial for making a very simple baby blanket. The only things I did differently were to round the corners (using a saucer to get the round) and slip stitching the gap closed, because I’m obsessive like that! Oh, and use dimple minky because IT’S SO FLUFFY!!
Found on Pinterest – can’t find the original owner…
We don’t know whether we’re having a boy or a girl and to my mind, pewter grey and aqua would work well for both. I like them too so that’s what I used!! I was careful pinning this together because Minky is a knit and the polkadot is a woven so there was the potential for it all to shift around a fair bit. The only other thing I did was to sew with the cotton uppermost. There really isn’t a whole lot to say about it – but it was nice to spend a bit of time with the sewing machine, doing something quick and easy that I know will get used!
Do you ever need a project that is quick, easy and extremely gratifying? Yeah, me too. Especially just after Christmas when the weather is bleak and everything is just a bit flat.
I’m in a massive declutter mode at the moment. Stuff is being shed left, right and centre. Even my sewing supplies are being culled and sold for cold hard cash. One of the ‘casualties’ was the desk chair I used in my sewing space. Man, that thing was big! Every time I moved anywhere on it, I hit something. My room is too small for such a big black monstrous piece of furniture so I flogged it. Then promptly spent the money on a metre of fabric and some piping from Frumble. But before you wonder how on earth decluttering, stash included, equates to stash acquisition – there was a plan!
We have a number of steel legged, round topped stools from back in the days when Husband and I owned and ran a hire boatyard on the Norfolk Broads. When refurbishing one of the boats we had 6 of these stools left over and rather than bin them, they’ve followed us around ever since. They make great occasional ‘need extra’ seats. Since deciding to loose the monster chair I’d been using one of those stools to see how I’d get on with it in the sewing space. Quite simply I loved it, it fit under my table so could get out of the way completely, was the right height and generally perfect. Except for the ageing red velvet covering.
So, 1m of Alexander Henry’s ‘Home Sewing is Easy’ fabric and some kingfisher blue piping (£15 in total so I still had change from the sale of the chair!!) later and I had a new stool! I completely winged the whole process! I interfaced the fabric with some medium weight interfacing and about the only measuring I did was for the diameter of the top of the seat and the depth of it (which I then doubled and added a bit to make sure there would be enough to tuck underneath and staple down).
This used up less than 1/2m of the fabric, so what do I do with the rest? Pinterest to the rescue! My machine cover is a very robust solid cover. Great if I ever want to move it anywhere, rubbish if I want to protect my machine whilst leaving the cables attached. Sewing Machine cover it was.
I used this tutorial from spoolsewing.com I adjusted the measurements a little to make sure it would cover my machine. This took no time to make though, even with the addition of the binding. I followed the construction steps in the PDF but with the addition of the piping what I should have done was: Attach piping to front & back panel. Sew end panels to top panel. Sew front panel to top/side piece. Sew back panel to top/side piece.
The reason I say this is the method outlined by Spool works perfectly if you don’t have inflexible, lumpy piping to negotiate that makes getting into the top corners a complete PITA. I ended up finishing that bit by hand.
I’m glad I added the piping though as it gives the cover a bit of structure that it wouldn’t otherwise have. You could so easily go fancy pants on this and interface the fabric, line it, quilt it, add pockets… I just wanted something fun and bright too keep the dust off! I’ve used up that metre now so poor old overlocker is going to have to wait until I actually stop being so precious about my dress length of this fabric and make a dress out of it! If she’s lucky there’ll be enough left over to make her a cover too…
In between making Bombshell swimsuits, going away for a weekend break, making Happy Happy Joy Joy swishy circle skirts and the usual mayhem that accompanies the run up to Christmas around here, I’ve been playing with some felt to make some holiday decorations! Just as well it’s felt too as Boy learnt yesterday when we were decorating the tree that glass doesn’t bounce very well, so some additional decorations were definitely needed and these ones are pretty indestructible.
Simplicity kindly offered to send me a festive pattern to play with and blog about; I chose 2545. I adored the gingerbread houses and the little felt ornaments, particularly the gingerbread men and women. The pattern also includes the blueprints to make a tree topper gingerbread angel, star and heart decorations, stockings and a tree skirt. There’s a lot of value in this pattern and I can see myself returning to it each year and increasing the decoration quota!
I’ve made some gingerbread people and some Christmas trees to decorate our tree. Some are ‘heirloom’ and some are ‘quick and dirty’! With the ones I took more time over, the embellishments are hand stitched on and use vintage buttons and lace from my stash. The quick and dirty options use Gutermann HT2 glue to stick the felt together and the embellishments to the felt – much easier when a small person wants to help you!
I machine stitched all three layers of felt together on my machine before trimming down the gingerbread layers and pinking the icing layer of felt as per Simplicty’s instructions. My favourite is Miss Gingerbread with her vintage sparkling buttons, lace and ric-rac skirt and hand sewn face. Mr Gingerbread with the green buttons was sewn and stuck (his eyes are tiny tiny buttons which Boy glued on), whilst Mr Gingerbread with pearl buttons was all hand sewn. His and Miss G’s eyes are french knots and their smile a split stitch.
I loved making the trees! Mine is the one on the right with a blanket stitched edge, ric-rac tinsel and vintage button baubles! It was a lovely way to use those odd singular buttons that are lurking in my button tin. They finally get to shine! Boy’s glued version is on the right. No sewing at all, just glue, tiny buttons and more ric-rac.
These were a perfect little hand sewing project to take away with me last weekend. Small enough that they took up no space at all and also I could make a lot of progress very fast with them. As you may have guessed, Boy loved helping make them and is very proud of them being on the tree (along with all the other bits and bobs he’s made over the last few years!). If you’re looking for some stress free Christmas crafting, this is a great pattern to start with – so many options!
I know that the blogosphere has been awash with all sorts of opinions on the GBSB. I didn’t want to jump in after just one episode, but we’re now 50% of the way through the four part series and I want to try and articulate my thoughts on the programme.
I’m sure most of you who read sewing blogs have also watched the programme if you can get access to it. Outside of the UK, YouTube seems to be the weapon of choice!
May and Patrick
The show follows the familiar skill tests, assessment and elimination format of Masterchef and The Great British Bake Off. Which means of course that we need some judges and these take the form of May Martin and Patrick Grant. A WI Doyenne and a Saville Row Taylor (and new men’s wear designer for Debenhams).
At the end of each show, two contestant’s are eliminated. So far we’ve lost:
Week One: Michelle and Jane (through illness)
Week Two: Tilly and Mark (I loved that Mark offered Tilly his arm as they left)
Now I enjoy watching this show, but I’m also already into sewing in a fairly obsessive way. Outside of sewing circles though, I haven’t heard much discussion about it. Not like Bake Off which every one could appreciate on some level; even if it was as simple as ‘I want to eat that’!
I worry that because sewing and garments are so tactile that the everyday person can’t immediately grasp the challenge of sewing a silk blouse. The majority of bought clothing is poly-something-easy-care-no-iron. How many people can begin to imagine how silk slips and moves when you work with it and therefore appreciate the technical challenges of constructing a garment with it. It’s not as immediately understandable as a ‘soggy bottom’ on a tart although we all eat and we all wear clothes, so maybe it should be!
My other concern is the speed that some of the challenges are done at. The refashion I think is about right and perfect to get someone interested. A bit of lace and an hour is a manageable prospect. Sewing a pair of tailored trousers in four hours when you have never done so; not so much. I worry that this does nothing to re-educate people about the value of clothing or how difficult some of these things are to do. There is an opportunity to really showcase and highlight the skills required to make a garment and I’m not convinced this is being made the most of.
Food traceability and quality is already in the mainstream, this has yet to happen for the clothes we wear.
And lets face it; the ingredients for a cake are a few pounds. The yardage for a dress is anywhere from £5 if you have the wonders of ‘the man outside Sainsburys’ on Goldhawk Road, or £40 if you go for a quilting cotton and higher still if you go really fancy! By extension, if a cake doesn’t work out, ah well, it was only a few quid and an hour. A dress doesn’t work out and it’s £10 on the pattern, £30 on the fabric and all the time you’ve just put into it. The potential to be put off on the first go is much much higher.
Each episode has a quick project that also seems to be covered in the accompanying book. So far it’s been the laundry bag and a tie side cushion. The construction of each has been massively glossed over and dealt with in two minutes. For instance the laundry bag has a gusseted construction which is far more difficult that it was made to appear. Thankfully the instructions in the book are much more comprehensive according to Jane’s review.
I guess I hoped for more. Maybe some more explanation about why something is difficult to help develop the public’s appreciation for our clothing. Definitely more signposting for people who may want to have a go so that they don’t become discouraged and know where to get the support they’re going to need.
Having said all of that, I know I’ll be watching the last two episodes. And there was a slight rise in the ratings for week two so it is working, which I am really glad about. As Miss P says, we really need this show to be a ratings success as without the numbers, the TV execs wont take the risk on comissioning any more sewing shows.
L to R: Lauren, Tilly, Jane, Mark, Stuart, Patrick, Claudia, May, Michelle, Sandra, Ann
I love Stuart’s incredulousness at what he’s managing to achieve each week and Ann’s cool, calm technical perfection. And the relief that someone who has sewn for as long as Lauren still has complete moments of panic. And Sandra’s cheekyness (I just need to look at your bottom Mr Grant). At the moment, the only two contestants who blog are Tilly and Lauren, although I know Tilly is lining up some guest posts…
Next week involves sewing a child’s dress, altering a shop bought dress and finally fitting and sewing a tailored jacket for their model. And then one more contestant will leave, leaving three contestants in the final on the 23rd April.
I don’t know who I want to win. At the moment I think I’m team Stuart or Lauren. Failing that, I’m team Patrick!
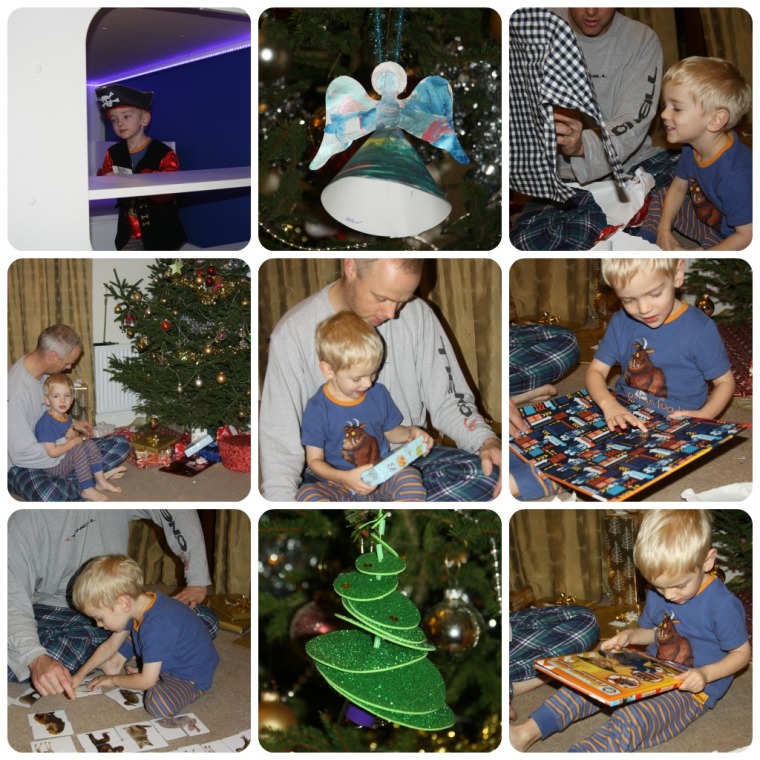
I hope you all had a wonderful Christmas Day? I’ve been a little quiet as we’ve had (what must be) a final 2012 incident but I wont bore you with it here! Suffice to say whilst I know 2012 has been really really good to some of you, I’m done with this year.
A massive positive though was that all the hard work me and Husband had put in on Boy’s new bedroom paid off. He absolutely loves it and disappears upstairs to play in it and have adventures!
I suspect his favourite bit is the lights under the bed – it’s an LED ribbon and there’s a remote control that you use to change the colours, or make the flash! He’s mastering climbing up and down to the top bunk too, although I’m quite pleased that he’s sleeping in the bottom one at the moment… I don’t want to hear a crash in the early hours when half asleep he gets it wrong! Lots of practice first I think!
There’s a lot of ‘Me Hearties’ going on too as he has a pirate outfit which he loves – a last minute ‘impulse’ buy by me in the Early Learning Centre the weekend before Christmas. My sister bought his some foam cutlasses and if I can I’ll get you a picture of Pirate Boy on his hobby horse brandishing a sword. He tries so hard to look fearsome, but is just too darn cute to pull it off!
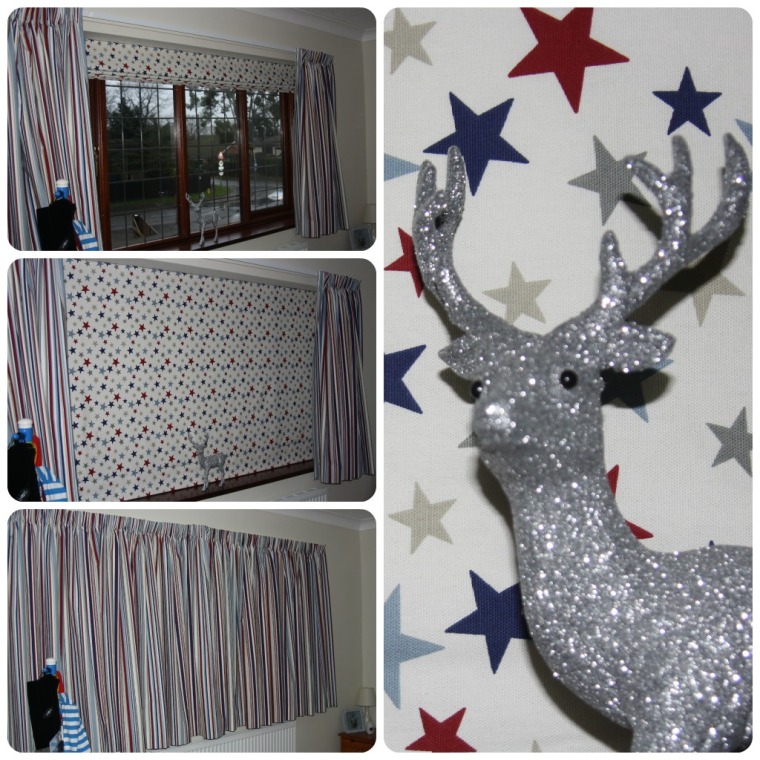
I got the blind and curtains done, finally hanging the curtains Christmas Eve (so late partially due to some idiot moments on my part during construction of the blind and having to re-do the header tape on the first curtain as it was too close to the radiator when hung). I am so pleased with how they came out though. It was definitely worth the effort and I hope they’ll have a long life as they’re not babyish…
I was a very lucky girl and got some lovely sewing goodies as well as my swap items! I now have the Alma Blouse pattern by Sewaholic which will be made up with some leopard print lawn with a black peter pan collar. Perfect for Pretty Grievances Jungle January!
I also now own some pinking shears – Gingher ones no less too and oh my, they do cut beautifully! Also some gorgeous lengths of fabric which will be pre-washed today as I fancy some very selfish sewing.
I hope you all had a wonderful day and were spoilt rotten.
Literally. For my second ever piece of unselfish sewing (my first was a bag for my sister, the others I made to sell don’t count!) I’m sewing the new curtains and roman blind(s) for my son’s bedroom.
Click image for source – and comprehensive curtain hanging like a pro instructions!
I’ve never been so nervous about starting a project before! When I started sewing I guess I didn’t know enough to realise that I didn’t know enough. Now I am very aware of the fact that I’m venturing into unchartered territory for me and that the stakes are pretty high – financially and because I want this to be as close to perfect as I can get it. It’s part of Boy’s Christmas Present you see (whole new bedroom, redecorated, big boy bed etc) and these things are going to be in his room for a very very long time and I don’t want to wince everytime I look at them for the next ten years!
Fabric for the blinds
I am researching the life out of what is really quite basic sewing. You know, straight seams only kinda stuff. The intimidating bits are
1. Getting the measurements right and the resulting maths about widths and pattern repeats right (which will be checked AGAIN tonight) so that
2. I order enough fabric, and
3. I’ve ordered / bought all the bits I need, and enough of them.
Fabric for the CurtainsClick image for source
I mean, the curtains are seaming three bits of fabric together, hemming them and then sewing some pencil pleat tape along the top. The hardest bit is going to be wrestling with such a big piece of resulting fabric! The bottom hems will be about 3.5m EACH! And I’m lining them, but that bit isn’t too bad either: sew three bits of fabric together, hem, sew right sides together to the other enormous bit of fabric and turn right side out and press carefully.
Weirdly, I’m far less intimidated by the Roman Blind which is far more involved in its construction but the maths is SO much simpler!
It’s the maths that’s scaring me… Not a subject I’ve ever been paticularly confident in… And if I get it wrong, it really is curtains.
The fabric is £10/m so definitely not at the expensive end of the market but I need 3m for the blind and 8.5m for the curtains. And 11.5m of blackout lining which is £4/m. So when you add all of that up, it’s quite a big chunk of money to drop into a project… Never mind all the sundries like header tape, batons, acorns, curtain weight, velcro, cord…
But at the same time, if I paid someone to do this for me I know I would easily triple the price (and probably more…)! Hell, if I put my time into the price it wouldn’t be cheap, but its for Boy, I don’t mind.
So, has anyone done this before?! Any reassuring words to impart, or resources to share?