There’s a Fine Line Between Being a Fangirl and a Stalker

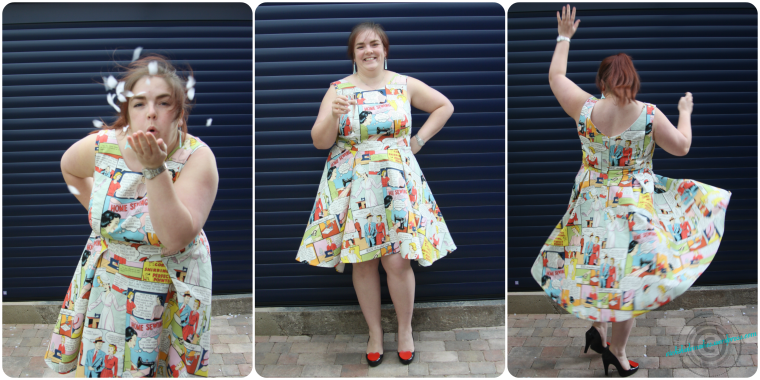
I’m a little bit scared that Sew Dolly Clackett may have tipped me over that line.  The whole point of this little frock-fest organised by Sarah at Rhinestones and Telephones is to celebrate the marriage of Miss Muldoon to Dr Nic in May.  The sewing tribute was announced eons ago and entries could be made between the 23 February and tomorrow, the 23 April simply by posting your photos over on the Flickr page specially set up.  And whaddayaknow.  It’s the 22 April and I’m typing this post whilst still needing to finish the never ending hem on my Dolly Clackett Dress and take the photos despite having plotted this dress since the announcement.  Actually since before then because as I said, there’s a fine line between fangirl and stalker.  But, I’ve done it.  And there’s photographic evidence to prove it!

Georgalex 1

I’ve always loved Roisin’s style.  She makes lovely dresses in the best prints ever.  In all seriousness, without her inspiration I’d still be using sensible colours in everything I make.  Roisin’s given me the courage to wear something a little brighter and a lot more fun!  Whilst there is certainly a time and a place for a sensible wool dress, there’s also a lot of fun to be had in wearing something bright and colourful and a little irreverent too.  When I think of a Dolly Clackett Dress I think of Alexander Henry fabric, full (preferably a circle) skirt, a fitted bodice and amazing shoes.  When I think of Mr and Mrs soon-to-be Clackett I think of Paris, Gin, Kate Bush, Pizza and a blue front door.  Does a blue garage door count?

Georgalex 2

I knew exactly which fabric I wanted to use as it has been sitting in my collection for over a year now waiting for the perfect dress.  It’s preciousness brings out in me Gollum like tendencies.  This was no time for a ‘suck it and see’ dress if I was going to use my ‘Home Sewing is Easy’ fabric.  This had to be something I’d love.  And what better than to use a fabric I love in tribute to two people who I’ve had the pleasure to (briefly) meet, annoy online and who are so fabulous?

Georgalex 4

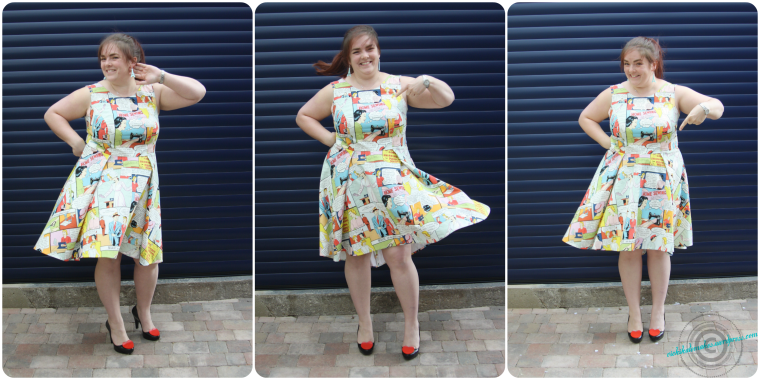
Ladies and Gentlemen, please be upstanding for the Floralex.  Hey, if you’re making a dress inspired by Roisin, By Hand London has to feature as does a pattern mash up!  As I mentioned, I didn’t want the hassle of fitting and I like the way the Elisalex bodice fits me.  Splice on the dipped-hem-circle-skirt-with-pleats from the Flora pattern and you have a lot of fun out of 3m of fabric!

Georgalex 3


I may have committed a minor misdemeanour in that the front of the skirt has a seam running down its centre but that was the only way I was going to get the skirt out of 44″ fabric.  It’s not that obvious on first glance and damn it, I love this dress!

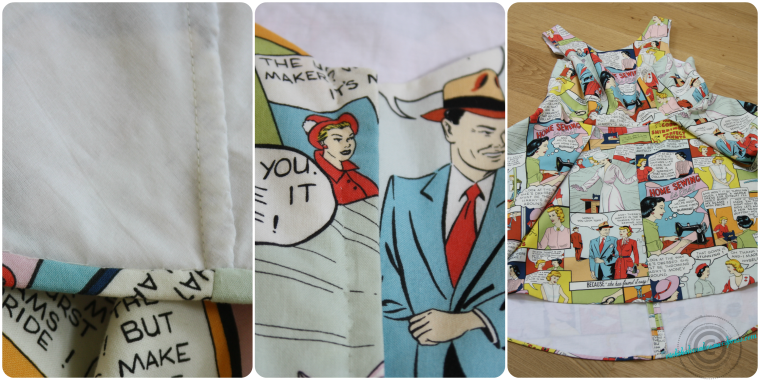
I cut everything out on a single layer to make sure I got the pattern placed where I wanted it and then lined the bodice using a plain white cotton and I underlined the skirt in the same.  I then did a kind of flat felled seam thing to make the side seams in the skirt disappear.  I was going to wrap the centre back seam in white bias tape to magic that away too but changed my mind.  It’s behind me so isn’t going to be that obvious (I hope).  And yes, I realise that the side seams are even less conspicuous…

Georgalex details


I know the preferred zip insertion at Clackett Towers is that of a hand picked lapped zipper and that is what I have done on this dress.  The canary yellow zip is carefully concealed by the lap and went in quite smoothly.  I did briefly consider an exposed zip but it just didn’t seem right with flirty skirt.  The hem is pressed up and then hand stitched to just the underlining layer so that it’s invisible from the outer edge.

Then, of course, you’ve got to accessorise.  Something Roisin is known for is her shoes and her Instagram outfit shots showing a slice of skirt and the shoes.  Did I mention the shoes?!  These Mel shoes are a direct and blatant copying of a pair modelled by the muse for this whole dress.  I had no idea that Mel shoes are so comfortable.  Seriously – you have no idea your in heels when wearing these things!  And I had to pay a little tribute to Paris and these earrings from Betsey Mae on Etsy are perfect.  I bought a necklace too but it got lost in the print – it’ll be worn though!!

Accessories

So, ladies and gentlemen, please raise your glasses to Miss Muldoon and Dr Nic.  I wish you both a lot of love, laughter and happiness in your future.  Love you guys x

Bound Button Hole Practice

Also known as, damn – I’m very proud of myself!

You all know I was swapping out regular old button holes for the glitz and glam slightly couture bound buttonhole.  There is no way on this earth that I was going to hack holes in my gorgeous wool and cashmere blend fabric without testing this brand new to me technique out first.

I’ve had Karen’s Bound Buttonhole eBook since she launched it.  I bought it as it was a technique I wanted to try out ‘some day’ and because I love reading her blog and wanted to support her self-published effort.  Being completely frank, without that little eBook there is no way this would have turned out as beautifully as it has.  If you haven’t done so already, buy her book. It will stand you in excellent stead when you want to use this technique.

Bound Buttonholes 1

Because the Milano Cape pattern by Papercut isn’t designed with bound button holes in mind, there aren’t any markings to help other than where to make a button hole.  So I needed to determine the width of the button hole myself.  Using the notes in Karen’s book I measured the width and depth of my button and added a smidge to determine how wide it should be.  I included the shank in my measurements and I’m not sure that I should have done.  Anyone with more experience than my one button hole have any advice on this?!

Even though this was just a practice I carefully thread basted my lines after marking them with chalk to make things easier (and whilst I photographed that step I haven’t included it in my collages – doh!).  I did deviate from the prescribed welt size as I wanted something chunkier.  Instead of cutting them 2cm wide (making each lip 0.5cm) I cut them 4cm wide so that each lip was 1cm.  I like these proportions better.

Other than that, I did exactly as I was told and I am seriously happy with the outcome.  To say this practice run has increased my confidence by a billion miles is an understatement.  I now know that my buttons will fit, that the fabric presses beautifully (and smells like wet dog whilst doing so – wool, I do love you!) and that I can totally and utterly make eight of these bad boys in the real thing (eek!).

Bound Buttonholes 2

Little win, big happy!

I’ve also got to recommend the button covering service I used.  I posted the cheque, order form and fabric at 22:00 on a Tuesday night and when I came home on the THURSDAY they were on my doorstep!  It cost me £8.00 to have ten of these dual dome buttons made which to me is an absolute steal.  In short, if you’re in the UK and want the most beautifully covered fabric buttons then I can’t recommend www.buttoncovering.co.uk enough.

Next step in Mission Milano is pre-treat what feels like miles of wool/cashmere fabric which I’m too chicken to lob in the tumble dryer with a wet towel!  Anyone got any film or series recommendations that I can watch whilst I steam a mother load of fabric?!

And… Have you heard the By Hand London news? They’ve launched a kickstarter campaign to start printing fabric! I’ve made a pledge… It’d be great if you can help too. You all know that I have some serious love for those patterns (2 more rides and Flora is mine!).

20140313-190902.jpg

Working for Flora

So, I’m sure you are more than aware that By Hand London launched their latest pattern last week, the Flora dress.  Oh, my.  Isn’t she an absolute show stopper?!  I’ve loved seeing all the tester versions across some of my favourite blogs.  And seriously is there anyone on this planet who, if asked, would turn the BHL girls down?!  And having seen some of the care packages they sent out to their testers, wow!  The BHL girls know how to look after their pattern testers!

She has a fitted bodice and full skirt that I love, but with a twist.  I love the faux wrap top and whilst I have always, always been wary of a mullet hem, this dress has converted me and I want one NOW!  But, I’ve made myself a promise to get fit and as an incentive for each fortnight I complete my 30 minute bike workout, I can buy myself a present.  Flora is going to be my first present.  I’ll tell you this, it makes me want to get on that bike and work!

In in the interim (when I’m not telling myself, xx minutes until it goes to an easier resistance, or xx minutes to go) I’ve been dreaming about which fabric I’m going to make her in.  And then Amy, who blogs at Almond Rock,posted an Instagram picture of a fabric at Textile Express and I was sold. I’d never come across this retailer before but I know Amy has used them on a number of occasions so I jumped in and bought the fabric (and some floral jersey too – well if you’re paying £6 P&P you might as well get your money’s worth!).

d8_floral_navy

It’s just perfect, Navy, floral and a lawn.  It’s going to drape beautifully and I may be a little bit in love!

If you want any inspiration though, just look at Lizzy’s TWO versions (AM and Nightshade which is a knockout), Sonja’s vibrant beauty, Dixie’s classic interpretation, Roisin’s use of a fabulous print, Marie’s classic beauty, Fiona’s Pretty in Pink version, Lauren’s vibrant summer dress, Zoe’s chic monochrome number, Nette’s vibrant red dress and Emily who selflessly made the dress for her sister!  If these incredible pattern test versions don’t get you wanting to get behind your machine and make your own version in very short order, I don’t know what will!

Charming Cami Dress

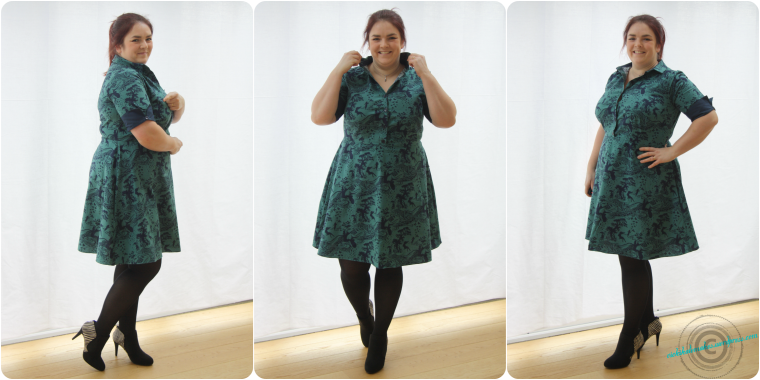
Ugh, my blog post titles are far from poetic!  However, it is high time I shared with you my version of Pauline Alice’s Cami Dress.  It’s been in my wardrobe quite a while now (since September!) as I made it pretty much as soon as the pattern was released – I’ve only just photographed it though hence why you only get to see her several months down the line!

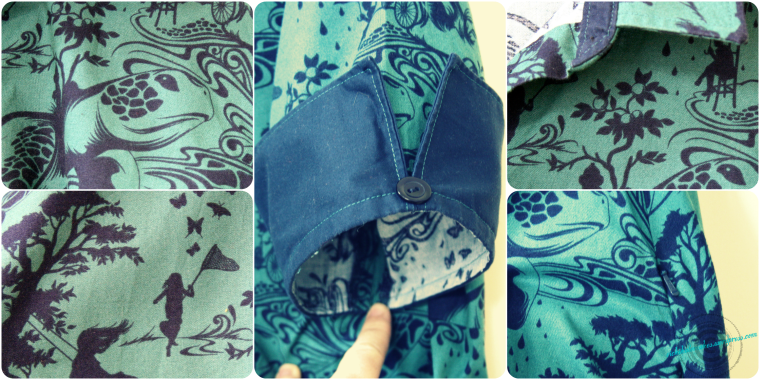
I made it in some Tula Pink fabric from her ‘Prince Charming’ range.  There are turtles, butterflies, girls in swings, waves and all sorts going on in the print.  I love the turtles the most though!

Cami Dress 1

Me being me, I had to mess with the pattern.  Sometimes I do this because I have a certain idea in mind, sometimes because I don’t like certain details.  In this case it was a mix of the two!

The two changes I made were to the finishing of the sleeves at the cuff and the shape of the skirt.  For the sleeves I used the cuff pattern piece from By Hand London’s Victoria blazer as I love the way it finishes the seam edge so neatly, but also provides some interest as well; particularly in the contrasting fabric.  The second change was to ditch the gathered skirt for a flared A-Line version.

I drafted the skirt myself using the technique in the Craftsy class ‘Design and Sew an A Line Skirt’ and then slashed and spread from the hem to the waist to get the biggest flare I could at the hem.

To match the contrast of the cuffs, I also used the navy contrast on the inside of the collar.  This is actually the second collar I made as I screwed the first one up completely.  Thankfully Four Square Walls published her collar tutorial just as I decided to rip off the first version and saved my sanity.

Cami Dress 2

Other, minor tweaks, I made were to put more buttons on the bodice as the FBA (Full Bust Adjustment) adds length and the number specified in the pattern didn’t look quite right.  I’ve got one of those amazing simplex guides that makes easy spacing of things like buttons an absolute walk in the park.  I also added a button at the cuff because I liked the way it looked!

Finally, I inserted the side seam invisible zipper in upside down.  This means the tab is at my hip rather than up under my armpit when I’m wearing the dress.  I find that the tag and inflexibility of the slider really irritates me if I insert it the ‘normal’ way up and inserting it so it closes by zipping downwards is an easy fix!

Next time (and there will be a next time) the only change I intend to make is to ditch the pockets.  Yep, ditch them.  Because of the side zipper it makes the placement of the pockets a little awkward as they’re an inch or so too low for me.  Don’t get me wrong, I generally love pockets, but because these aren’t quite in the right place for me I don’t use them.  I know there are other pocket treatments that could work, but frankly I pretty much always have some sort of bag with me so leaving them off isn’t a massive issue!

Phew, I had more to say about this dress than I thought!  I hope you’ve all had a good week.  I’ll be glad when this one is done.  Work has been busy and exhausting and I got my exam results today and now I know that all the work I put in paid off!

20140221-105625.jpg

I’m also pattern testing (So. Much. Fun!) at the moment and have a full on weekend planned which included catching up with friends and their little people, swimming, more friends and helping Husband put together three enormous (for us) tenders.  Safe to say life is exciting and challenging at the moment.  One thing it isn’t is boring!

Anna the 1st

Click image to go to source

Happy Valentines my lovelies!  If you’re into this particular day, I hope you’re having a wonderful one and if you’re not, I hope you can side step the mushy stuff and maintain your sanity!  Husband has a card and some After Eights, and I’ll cook something nice later but that’s the limit in this household!  As I’m writing this on Thursday evening I have no idea if he’s remembered or not (I suspect not… But that’s him and it doesn’t bother me).

As the sun was shining yesterday and I was working at home, I used my lunch break to finally, finally, photograph the first By Hand London Anna dress I made.  This is by no means a recent make of mine – more like last summer shortly after it was released!  It’s a really happy, summery dress – mainly because of the fabric (mermaids, fish, whales!).

Anna 1

I did my usual FBA and sway back adjustment on this as well as Sonja at Gingermakes back neckline gape fix.  I used french seams where I could and  I catch stitched the sleeves for a lovely, flexible finish.  I also used a few tricks I’ve picked up to finish the facings and the facing to zipper.  This dress taught me that I needed a little more length in the bodice as the waist was a smudge too high and the pleats were also well into the bewb area rather than under them.  Something I didn’t catch when I actually toiled the bodice of this!

To finish the facings I sewed the facing to the interfacing, right sides together, pinked the seams and then flipped the interfacing over so that the glue side was against the wrong side of the fabric.  I then pressed.  This makes a really beautiful finished edge on the facing and takes a very short period of time to do.

Anna 2

The other finishing technique I used was where the facing meets the invisible zip at the back.  I use the Fashion Incubator method, which always gives me a really nice finish – In fact I use her insertion method too where you sew up the seam below the zip BEFORE you insert it.  Generally a fantastic resource for all sorts of things – beware you will loose hours but gain tons of knowledge!

I like this dress – although it is a little sheer!  Care is needed with underwear colours and situations where you’ll be back lit.  And strong gusts of wind as this skirt will catch a breeze as easily as a circle skirt!

So, there we are.  My 1st Anna dress.  A short and sweet post as this dress is already so well documented on the inter webs!

PS If you fancy winning a rather lovely brolly or a pattern of your choice, let me know in the comments of this post.  I’ll pull a winner out of the hat on Monday!

Secret Santa Anna Tron

Well, Hi there.  What do you mean it’s nearly the end of January!  Your lying.  Oh…  It really is.  Where has this month gone?!  Suffice to say it’s been a bit busy round these parts, but I’ve finally managed a little sewing and have one of my favourite dresses to date to show you!

Anna Tron

This is the By Hand London Anna dress and is the second version I’ve made (I just haven’t photographed the first one yet, OK?!).  The fabric was a gift from my Secret Santa as I took part again last year with the swap organised by the lovely Kat who blogs at Krafty Kat.

The fabric is a stretch cotton twill with this fabulous black and purple geometric print.  I went with the bateau neckline for this make as I didn’t want to break up the print.  The dress came together beautifully and I swapped out the facings to use the hot pink bias that accompanied the fabric.  My only irritation with the dress is my fault!  I’m shrinking (which is a good thing) and despite taking the side seams in on this over and over it’s still to big through the torso.  I’m going to follow Roisin at Dolly Clackett and hope that a turn through the washing machine will shrink it’s proportions suitably.  Or take even more out of the side seams!

Anna Tron Fit

I hope the photos above illustrate what I mean.  I’ve got a lot of fabric pulled behind my back or at my waist.  I’m not sure now the washing machine will fix this – I may need to be more daring in my side seam reductions!

So, along with the fabric, came the rather gorgeous pink bias binding which I used to finish the neckline, arms and hem.  I think it’s this inclusion of a really bright colour along with the geometric pattern of the fabric that made me name this dress ‘Tron’ as I’m not usually one for naming my makes!

Details Anna Tron

See, I love that insane pop of colour!  It matches my hangers too and I’m pretty happy with that pattern matching up the back where the invisible zip is.  So, not only did I get enough fabric to make a dress and finish it with a pop of colour, I also received a number of lovely sew in labels and a little handmade felt fox!  I love foxes so Secret Santa was spot on the money there, too.

Secret Santa

Just wonderful!  One of those labels will be going in Tron Anna.

And for those of you who haven’t come across Tron or Tron Legacy (I’m sorry, I like them both!) here’s a poster for the original film showing the illuminated patterns on the costumes that this dress makes me think of:

Link to Source
Link to Source

Annalex

Sorry, more By Hand London dressing going on here…

Let me introduce to you Annalex; Elisalex’s bodice and Anna’s maxi skirt.  More Mrs Robinson on the leg front though than Angelina!  I made this a long long long time ago (August!) but By Hand have just released this ‘love child’ post so I thought I really ought to start attending to this here blog again now I’ve sat those exams!!

Elisalanna

You got a sneek peak of this dress in my post about my Victoria Blazer.  There’s not a lot really to say about this dress!  The bodice is lined and the skirt french seamed.  It did take a bit of adjustment to get the skirt panels to continue the lines from the bodice, but nothing overly complicated.  I just made some skirt panels wider and some narrower as necessary!

I originally had a completely different plan for this dress.  I wanted to use a tropical print for the centre panels of the skirt and bodice and then a plain black for the sides to give a really neat colour block effect but I couldn’t find the print I’d imagined in my head anywhere.  I’m still on the look out though as that dress has to be made!

So I used this cotton sateen that came from my Goldhawk Road jaunt.  I love polkadots but if they’re too regimented it annoys me for some reason!  I much prefer a more random dottiness (which describes me quite well…).  So when I saw this fabric in a window display I needed 3m of it!  Needed I tell you!  At £5 a meter and 60″ wide that was no hardship either.  As long as you don’t have a directional print it’s perfectly possible to get a maxi from a reasonable amount of fabric.

My only miff with the fabric was that when I got it home it had a grubby mark at intervals along the selvedge where the roll had been propped on the shop floor.  I could not get this out so had to work round it.  If I’d known it was there I would have negotiated a better price on the fabric.  Ah well, live and learn.

Elisalanna Detail

So the bodice is lined (using some nautical vintage cotton) as per the Elisalex instructions and the skirt is french seamed as per Anna’s.  I hemmed the slit by hand as well as the hem and used a hand picked regular zip rather than an invisible one.

There’s not a lot more to say really!  The mash-up of two gorgeous BHL dresses is a success in my eyes and those girls can do no wrong.  Georgia is in the que and Charlotte has also been added so I now have the full collection…  I really must photograph Anna; the post is written but, photographs…

By Hand London Collection


Oh, and it was my birthday over the weekend!  The Charlotte skirt was a gift from me to me (to be made up in a small hounds tooth), I also received a new food processor as I blew up the last one (it was 15 years old!!), the Batman Trilogy (Christian Bale versions),  a new cycle helmet, a Crud Catcher rear mudguard and a bike trailer for Boy as he’s not up to long distance rides yet.  Also the Rock of Ages sound track as well as Despicable Me 2 (if the postman ever brings it – it’s allegedly out for delivery as I type…)

I was also treated to a pedicure so I have pretty toes at the moment and as I’m rubbish at coming up with a gift list I now have money to spend on Amazon and some cash to spend on whatever I like!  Any suggestions?!

This Is MY Pattern; It’s Got My Name On It!

The Victoria Blazer, of course.  Not named for me but I can dream, right?  I mean who wouldn’t want to be one of the By Hand London girls?!  I bought this pattern  on the way home from the Goldhawk Road meet-up in August and all the fabric for this project came from that venerable street of fabric retailers although I only paid for the lining!  I also made this in August and am still catching up with all the garments I’ve made and want to share with you!

Victoria 2

Now before you start to panic that I pilfered my way from one end of the road to the other I have one word for you: Swap.  I have never experienced anything like it in all my life.  Seriously, there was so much gorgeous fabric needing a new home!  Everything from Liberty Lawn to mystery vintage synthetics, miles of jersey, notions, patterns…  It was somewhat overwhelming!

So I hung back and didn’t lunge for the table, I just let everyone else do their thing and then had a look to see whether there was anything I wanted.  I picked up two pieces, some navy cotton drill / twill and a mystery fibre tiny houndstooth.

The navy twill / drill became my blazer.

I’d actually bought the lining earlier in the day whilst Roisin was still with us as I’d seen it in one of the shops (on the same side of the tube station) and as I knew she’d already made the cropped version which was also my plan I sought her expertise on the amount needed.  1m was advised and it was perfect and I think the fabric was only 45″ wide.

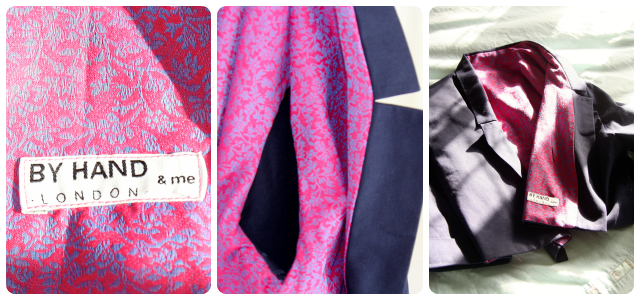
So this little jacket cost me the price of the pattern and £5 on some sort of cotton blend brocade in cerise and blue and a thank you to whoever brought that navy fabric to the swap!

Victoria

I love this little jacket and whilst I didn’t line the sleeves like Sonja I did slipstitch the lining to the armhole seam, enclosing all the raw edges.  I also used one of the lovely labels that come with the By Hand London patterns; for some reason I guard these things and this is the first one I’ve used despite now having made four iterations of BHL patterns!

I’m seriously considering a longer length one but with similar mods to the shape that Jane has made, isn’t it delicious?

And I also have the winners of the Simplicity Give Away!!

Congratulations to Jenni and Tracy who each won the trouser pattern and to Amy and Grace who each won a copy of the dress!  You should each have received an email from me!

Elisa-ish Dress

I’m slowly catching up with all the things I’ve made over the summer!  This dress has earned the status of being ‘precious’ for a number of reasons.

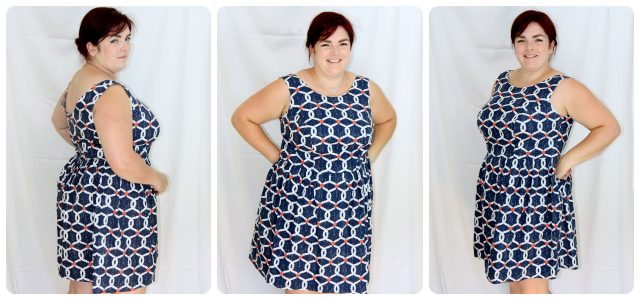
First up, it’s responsible for starting my love affair with By Hand London patterns.  This was my first pattern from those incredibly talented girls and what can I say, that bodice is a dream, a dream I tell you!  I love the scooped neckline and the plunging back and the princess seams.

The second reason is that I wore this dress (having hemmed it the night before using a head torch in bed) to the Goldhawk Road meetup in August.  So this dress was made for a much anticipated event and has a lot of very happy memories attached to it.

Elisalish

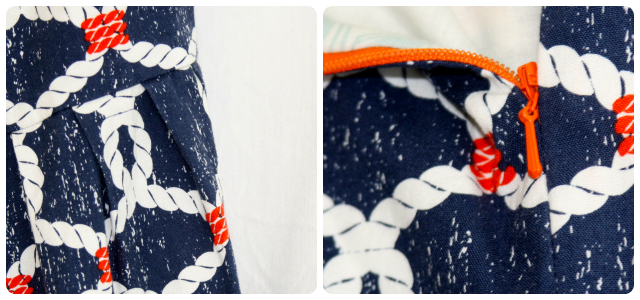
The fabric is Michael Miller and is called Rigging from his Ahoy Matey collection.  It’s a gorgeous fabric that just behaves really well and presses beautifully.  Rosin who blogs at Dolly Clackett is also a fan of this range of fabrics and has used this print here and using Ship Shape in the orange colour way here as well Stay the Course here (which I also have in the stash and is destined to be a Belladone, probably next spring now.)

The dress is an Elisa-ish as I chickened out on the tulip skirt.  I’ve got curves as is and I didn’t know if that was a step too far so for this version I created a pleated skirt using the full width of the fabric.  Nice and simple and doesn’t add too much bulk at the waist.  I also used a ‘Tango’ orange invisible zip.  I have no idea how I cam to have such a blazing orange zip in my collection but it matches the orange accents beautifully.

Elisalish Detail

I’ve been wearing this dress a lot and will be wearing it with tights and a cardigan as the weather is now so autumnal (well it is at the moment as I’m catching up on blog posts and scheduling like mad!) although if we do have an Indian Summer and late September gives us one last burst of sunshine I wont complain!  In short, I wish I’d bought this pattern a year ago when it was released rather than waiting a good twelve months to get on the By Hand London band wagon!

Put it this way, I felt so good in this dress and received so many compliments on that sunny day in London I ordered the Victoria pattern on the train on my way home!

PS.  I haven’t forgotten about the Simplicity Pattern giveaway, I’ll be posting the winners soon!

Weddings and Goldhawk Road

Umm, Hello?  Is anyone still there?  Please accept my apologies for dropping off the face of the earth for six weeks.  Life kinda happens and it was case of sew or blog; I took the selfish option and spent time with my machines.  In another post I’ll have three new dresses to show you although you get a glimpse of one later on…  It’s nice to be sat here writing again as I’ve missed the interaction we have on this little web page.

Last time I was part of your feed content, I was in panic mode for my Babyiest sister’s wedding on the 19th June.  Well I’m pleased to report that it all went very well and she’s now a Mrs.  The veil was finished in time as was the hem on my Mother’s dress and I think everyone had a good day.  It was a very hot and humid day, the first indicator of the good weather that was headed our way.  It was an outside civil ceremony and quite short, but also lovely too.

Wedding 1

There you are; me, Mother, Babyiest sister and Middle sister.  None of us look very much alike!  Another bridesmaid and her daughter, plus Boy and Me began the procession down the aisle followed by Father and Babyiest sister.

Wedding 2

The new Mr & Mrs signing the register and then getting photographed by pretty much everyone.  Boy had completely lost interest at this point!

So in between then and now I’ve been working, studying for a course for work which has also involved nights away (traumatic for all of us as I’d never left Boy before, let alone 3 nights / 4 days for two weeks on the trot) and also been looking forward to  my first ever sewing meet-up!

Goldhawk 1

On Saturday 3rd August I joined 37(?!) other like minded souls in Goldhawk road to shop, swap and chat the day away.  I finally got to meet some ladies I’ve been ‘talking’ to for a very long time; Claire (our fearless organiser), Roisin, Rachel (who was here on holiday from Brisbane), Amy, Kat, Emmie and Dibs!  I also got to know some new faces – Hi Alison!  The group shot of Emmie, Alison, Roisin, Me (in one of my new dresses), Rachel and Amy is shamelessy ripped from Roisin’s blog which if you don’t read, you really should.  The photo was taken by a very dapper looking Nic or ‘Roisin’s Boyfriend’ as his name tag proclaimed!

We had an hour of shopping before meeting up for lunch.  Let me tell you as a girl from the country, Goldhawk road is overwhelming!  There is so much choice you almost can’t cope!  I say almost can’t cope but I did make a few purchases but I also came home with money in my purse…  The prices are jaw dropping too.  I’m used to paying £10/m or more.  Cotton shirting at £3.50/m?  Wow.

Goldhawk 3

So I bought four different shirtings for Boy.  His favourite is the pale blue check, followed by the navy plaid, then the stars and finally the waves.  He’s got quite conservative tastes that little man!  The navy blue irregular polkadots is a cotton sateen and is going to be a By Hand London mash-up-maxi.  The pink and blue/lilac is a cotton brocade and is destined to be the lining of another By Hand London pattern.  The purple is a gorgeous knit that I got for £4/m with a slight crosswise stretch but not stretch along its length – I guess it’s a stable knit?!  I have very little knowledge of knit fabrics but this is going to be a Tiramisu and as I bought 3m there may be a top as well…

These were bought both before and after our lunch at Liz’s Cafe.  The food was lovely and they coped with such an enormous group really well.  It was then time to experience my first swap!  I’d bought some yarn, a few patterns and a couple of lengths of fabric to go into the enormous pile!  I only came away with two pieces though; a navy cotton twill to be paired with the brocade above and a length of tiny houndstooth fabric which is very drapey.  I think it’ll probably become a skirt.  Also a bag of buttons; just plain mother of pearl effect ones that will be perfect for a certain Boy’s shirts!

Goldhawk 2

I sat with Rachel for lunch and had a lovely time chatting to her and the others around us (whose names I have forgotten – I am so sorry!).  There was much admiring of her Miette cardigan.  I just wish I had the patience and the time to knit, but I don’t.  Doesn’t stop me appreciating the skill in others though!  I also got the chance to finally say Hello to the wonder that is Dibs!  I have read her blog forever and she is just a gorgeous person.  We didn’t get to chat long, but hopefully we’ll cross paths again and get to chat properly.  Both of the above photos are from her camera!

Goldhawk 4

After lunch, there was time for more shopping and I bought my favourite piece.  This is a border print and I know exactly what I’m going to do with this piece of stretch cotton sateen.  But I’m not telling you yet!

So, two fabulous days but for different reasons.  No more weddings in the family for the foreseeable future but I’d love to do another blogger meet-up next year.