Plotting and Planning But Not a Lot of Sewing… Yet…

I’m not even keeping up with my ‘one post a month’ target at the moment am I?!  But hey, tell you something you don’t know – right?  I promise I’ve had my reasons though, the main one being this:

Fidget

Meet Fidget, mostly known as ‘our baby’ if you ask Boy.  It’s earned the moniker as during the dating scan earlier this week they did not want to stay still and have their measurements taken, or give the sonographer an easy first appointment of the day!  Hence the face down, slightly blurry image!  Everything looked good though and the blood tests have come back as all being well.  We’ve also made it out of the first Trimester so are starting to feel a little less worried and able to share the news.  We’re hoping to meet Fidget in mid to late February.

I’ve been too tired to sew and the be quite honest, not even sure WHAT to sew!  Bed time has been 9pm for weeks, which basically means no sewing.  Sleep was the priority!  Instead I’ve been hoping, dreaming and making some vague plans – what to wear being one element.

I’ve had fun sketching in my Fashionary and come up with a few ideas that I hope will work in the coming 6 months or so as well as afterwards, and some may even have a longer ‘shelf life’.

Here’s what I’ve come up with:

Butterick 5860, which is a wrap dress.  I’ve got some fabric earmarked to make at least two of these as I suspect they’ll become my uniform at work.  I have a colleague who had the most chic and pulled together maternity wardrobe during her recent second pregnancy and is the inspiration for a couple of pieces in my planned wardrobe…

Staple Dress by April Rhodes but with the shirring falling just under the bust and with a bump accommodating adjustment.  This is currently in progress.  I’ve just got to get brave to make the bias binding from a very silky rayon.  I’m gonna have to face that soon as I need it for a wedding in just under two weeks!

Papercut Patterns Circle Top as this will work now and well into the future!  So far I’ve got a navy and a purple version planned.  These will be in solids to give maximum wearing potential and are in two of my basic colours.

Maria Denmark Day to Night tops (why do I always want to type Knight when writing about this top?!).  I’m going to use Zo’s maternity alteration on these as I need some tops to go with the maternity jeans I had when pregnant with Boy.

I’ve also found a gorgeous French company called Deuxieme Arrondissement which make some gorgeous maternity patterns.  I’ve bought two:  The Duo 13H and Robe Minuit.  I think the Duo 13H will be perfect for a wedding we’re going to in December.  They’re completely different to any other maternity patterns out there, and whilst they’re entirely in French, I have faith in my language skills…  They’re printed on lovely thick paper and I’m looking forward to using them!

I’ve also hacked Jamie Christina’s Mission Maxi and am wearing a maxi skirt from a slightly failed experiment as I type.  I basically used a double knit and whilst I compensated for the lack of stretch everywhere else, with my changing chest size, it was a tad snug up top!  So I lopped the top portion off to turn it into a skirt.  I will probably revisit though, armed with a more suitable knit and again use Zo’s tutorial.

Finally, I’ve bought Burda 7239 with the express intention of recreating a top I wore when pregnant with Boy.  It was basically a cropped wrap cardigan with a false top underneath it made of a very light weight cotton.  It was fabulous to wear and my only splurge on maternity clothing with Boy.  It came from Mamas and Papas and cost me close to £40.  I wore it to death.

What I also need to do (and this is going to have to be interspersed by other projects) is crack on with my Papercut Patterns Milano Cape.  This was also inspired by my colleague, but it seemed wrong and tempting fate to do too much work on it whilst trying and then in the early stages of pregnancy.  Call me superstitious or plain daft, but after previous experiences I didn’t want to be presumptuous.

As for Fidget – well not a lot planned there at the moment as we’re not going to find out whether they’re a he or a she until they make an entrance into the world.  We’ve also got the vast majority of what we need for the early months from when we had Boy.  He was also an unknown so all our early baby stuff is neutral!  I think I may have a go at adapting Dog Under My Desk’s Day Tripper bag to be a more fun changing bag as the one from the days of Boy is a very man friendly grey!  Oh, and I’d love to make Boy and Fidget matching quilts…

So, some ‘quick’ projects (I hope) and some more involved…  Time will tell if I manage to get even half of them done!

Gather Kits: Mortmain

Hi y’all.  Sorry for the absence on Monday it has been a crazy couple of weeks and this weekend there was just no let up.  As a result I have been floored by a cold (yep, a simple cold) and sore throat.  My body is telling me I need to give myself a bit of time for some R&R!  Long story short, work is busy, my Husband’s self employed status is turning back to employee and director as of the 1 April as we’ve taken the decision to change his business into a Limited company.  His business is stupid busy, which means behind the scenes I’m busy!  We’ve recently put in for a number of jobs and been awarded the majority of them which makes me incredibly proud of him but also brings with it a fair degree of stress as these are all on a commercial level.  Pretty damn impressive for a one man band!  At the moment I’m working a minimum of 32hrs a week in my place of employment, working 10-20 hours on Husband’s business and being a Mum as well as trying to maintain a clean(ish) house with food in the cupboards!  How I’m not crazier than I am I have no idea…

Anyway, please forgive my less than glowing face and somewhat grumpy expression, I wasn’t feeling exactly glamorous when taking these, but you’re more interested in the dress than me, so what the heck!

Mortmain

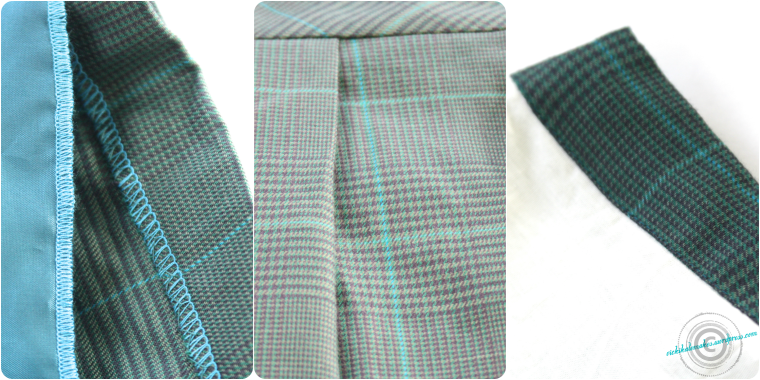
Back in 2013 Gather Kits were looking for pattern testers for their first pattern ‘Mortmain’.  I stuck my hand in the air and was lucky enough to be picked!  This is actually my second version of the dress as the first one is now too big (wahoo!).  I made it using a teal plaid wool (I think, it was from the charity shop and presses like a wool!).  I did my usual FBA (please forgive the bust darts that look like they’re heinously placed – I’m wearing a different bra to the one I fitted this in) and sway back adjustment.  I also chose to fully line this rather than just use the facings and also swapped out the exposed zip for an invisible one (but I forgot to take back view photos – sorry!).

Because I chose to line the bodice with white cotton, I didn’t want to run the risk of this peeking out around the neck or armholes.  So I carefully pressed the edge of the facing under and edge stitched it to the lining.  I’m really pleased with how close I got the edge of the facing and how close to invisible it is!  To get a really good finish on the lining I followed this tutorial.  I then catch stitched the lining to the waist band of the skirt.  This enclosed where the skirt meets the waist band too.  I lined the skirt by duplicating the skirt pattern piece and creating the box pleats with both the outer and lining fabric.  I think I got the plaid lined up pretty well!  The lining was finished with my overlocker and I overlocked and pressed up the skirt hem before catch stitching it by hand.

Mortmain 2

I love working with plaid – it’s a challenge but when you get it right it’s really satisfying too.  You can also have fun with the direction so I cut the waist band on the bias and used some lightweight fusible interfacing to stop it stretching out.  It gives this work appropriate dress a little bit of a twist and some added interest.

This pattern is a great basic and the box pleated skirt manages to have a full hem that I love with out being too bulky around the waist.  The separate waist band nips you in and gives a lovely shape.  I used the instructions to insert the exposed zip on my first version and they work really really well giving a fabulous finish.  All in all I’d recommend this pattern and not just because I was lucky enough to test it!  It’s a great building block and with the sleeve options with their cute cuff detail it has so many possibilities!

Ombre Cambie

I thought I’d break up the By Hand London love in that’s going on around here with a return to our favourite Canadian designer!  This is my second version of the Cambie and this time I chose to use the A-line skirt as gathers on my waist aren’t my favourite thing!

I made this dress for a party with a BBC theme – which is about as broad a remit as you can get!  I decided to go with Star Trek as I used to spend every Tuesday evening sat on the floor in the lounge, eating dinner with my Dad watching The Next Generation on BBC2.

Make it Sew

Captain Jean-Luc Piccard was and is one of my heroes!  And when I saw the above it was just perfection.

But back to the dress!  As I mentioned, it’s Sewaholic’s Cambie with the A-Line skirt.  Bodice wise it is identical to the first version; usual FBA and sway back adjustments.  The skirt is as Tasia drafted.  It all went together beautifully.

Startrek Cambie

I had a lot of fun turning the plain Enterprise printed fabric (from Plush Addict) into the gorgeous Ombre you see!  I did a bit of Google research (seriously, doesn’t all research start there?!) and used this tutorial to dye the dress.  Because I wanted the Ombre fading down the dress I made the dress shell first and then dyed it in a mix of Navy and Amethyst Dylon dye with the shoulders staying in the longest.  That was fun and messy!  But as I made this dress back in June (I did warn you I was way behind on blogging my makes!) I played with the dye outside.

It’s not a perfect job, there are some bright pink spots where I didn’t quite mix the powder properly into the water before dunking the dress, but I kinda like the odd bright pink spots dotted across it.

Cambie Dots


I then finished the construction with the bodice lining etc as per Tasia’s instructions.

Just to finish off the outfit, I bought a communicator style brooch from eBay and wore that on the dress as well (Not a TNG one though too much ££!  It’s the style in the recent films which I loved!).  I got so many comments on the dress and I can also wear it as day wear.  In fact I’m wearing it today, along with my Victoria Blazer whose lining coordinates beautifully with those bright pink spots!

Simplicity 2217 or The Juicey Juice Dress

I was among the host of lucky bloggers Simplicity contacted wondering if I’d like to choose a pattern to review and also hold a give away with.  After talking it though with a rather lovely blogger who’s got more experience of these sorts of posts, I gratefully and somewhat gleefully accepted.  This was back in June.  I owe Hannah a massive apology for the length of time it has taken for me to get the dress sewn and also get the post up.  Hannah, I’m so so sorry.

One of the most enjoyable parts of this whole process was trying to come up with a short list from Simplicity‘s massive catalogue.  I was intrigued by the Amazing Fit concept having seen Karen’s version of 1882.  I was also intrigued as to whether the concept would work for me as I have a 6″ difference between my high bust and full bust measurements.  I chose S2217 to try out and I’m rather pleased with the results!

Simplicity

In a nut shell, Simplicity have taken a lot of the flat pattern fitting adjustments out of the equation for you.  THere are different sized bodice pieces to fit your bust and different sizes at the hip for those with more (or less) curves.

Here’s how I selected my pattern pieces:
My upper bust is 38″ so I started with a size 16.  For each cup size the pattern increases by 1/2″ and an A cup was 40″ (this includes wearing ease) up to a D cup at 41 1/2″.  I needed 42″ but for the sake of science decided to go with the pattern piece for a D cup with no further adjustments.

At the hip the options were for a slim fit at 43 1/2″ (again this includes wearing ease), 44″ for an average fit or 44 1/2″ for someone with a little more curve.  I chose the curvy fit.  And to make fitting even easier the side seams are sewn last and have 1″ seam allowances to make those final tweaks!

And you know what, to get this information I didn’t have to measure a single pattern piece.  It’s all printed on the back of the envelope.  This is a big deal for me as I can’t remember the last time I used any of the big four’s patterns and had this information so easily accessible.  I’ve always had to measure the tissue to work out the ease so not having to do that extra piece of work to ensure a good fit was lovely.

I was really trying to talk myself into using some fabric from the stash but I’d seen this stretch sateen on the Minerva Crafts website and it was just calling to me.  I prevaricated and sought the opinion of Twitter.  A certain Australian gave me the final push I needed; Lizzy you were right (as always!).  I love the combination of this fabric with this pattern!  Some of you may have also noticed that the rather wonderful Dibs used the same fabric for her Minerva Blogging Network dress.

Construction wise this was really straight forward.  It’s an unlined dress and with the stretch of the fabric I chose I was happy to forgo the lining.  If I want to wear tights (and as it’s decidedly autumn now I will be!) I’ll just wear a half slip with it.  If you did want to line it Sew It Anyway has a really thorough post on how she lined hers here.  She wore it to the Goldhawk Road meet up and it’s a divine dress!

Simplicity Detail

There were three variations I made to the construction of the dress;

The first was to put a box pleat in the skirt.  I just could not understand what the instructions were asking me to do and the pattern envelope illustrations and photo suggested a box pleat so that is what I went with.

The second was to use bias tape instead of facings.  I really hate facings and avoid them where ever I can and this was no exception.  It meant a ton of hand stitching to secure it on the inside but I think it was worth it.

The third was to cut the wrap portions of the bodice on the bias.  The pattern instructs you to cut on the straight grain but I wanted to play with the direction of the pattern on the fabric so bias it was. I’m really pleased with the effect.

Inside is finished with the aforementioned bias tape and serged seams allowances.  The waist panel is self lined and gives some gorgeous structure to that area; it was supposed to be interfaced but as the fabric has quite a bit of body I didn’t bother.

This isn’t an every day dress for me, it’s a bit too vavavoom for the office but for an evening out its perfect!  And the name?  I’m drinking a home made juice as I write and the colours of the fruit and veg that went into it remind me of this dress:

2 apples (red & green)
1/2 lemon (yellow)
2 carrots (orange)
1 beetroot (pink / purple)

Simplicity Giveaway

So, if you’re keen to give this dress a go I have a give away for you, thanks to the lovely people at Simplicity!  A copy of S2217 or if the dress isn’t your thing I also have a copy of S3688 a gorgeous vintage inspired top and trouser set that Debbie at My Happy Sewing Place has made.

I have each pattern in both size ranges so four prizes!  All you have to do is leave me a comment below letting me know which Simplicity pattern is your favourite and which of the patterns you would like to win and the size range you need by midnight on Sunday 22 September (that’s the midnight just before Monday, I always find that a little confusing!) BST (GMT+1) .  I’m happy to post internationally. 

**This give away is now closed **

Thank you again Simplicity for the wonderful opportunity to try the pattern and also for the chance to give away patterns to my readers!!

V2903 – Musings and Modifications

First up, thank you for your thoughts on the colour for this dress!  I think the Teal is going to be a clear winner!  Which makes me happy as on reflection its my favourite too!

I think it’s only fair to say that this blog is going to be a bit V2903 heavy for the next month or so.  This is a ‘project’ dress and I want to do the best I can with it.  I hope you guys are going to be OK with me talking about it incessantly and live through the process with me?  I am probably (make that definitely!) going to be asking for advice and help saving my sanity as we go along too!

So, on to the modifications and musings!

V2903 – Illustrations and Line Drawings

The dress is tea length, which looks gorgeous on tall willowy people.  I’m neither tall (5’4″) or willowy!  I have a suspicion that the tea length will drown me so I am highly likely to chop the skirt off around knee length.  I’ll probably toile the thing as per the pattern though just to see.  You can bet I’ll be asking your opinions on this aspect – sometimes you need someone a little more detached to make a more objective judgement!

I’m also going to remove quite a bit of ease.  Comparing  the body measurements with the garment measurements printed on the pattern shows that there’s 2 1/2″ ease at the bust and 3 1/2″ at the waist!  That seems like quite a lot to me.  I know I prefer much less ease in the bust so I’ll be taking this down to about 1″ and about 1 1/2″ at the waist.  I’m adding a little more to the waist as I really want the lines to be smooth there (and it’s also my biggest area of paranoia).

The only other modification is that I’m going to use the deeper yoke with the shorter sleeves.  Which isn’t really a modification, just messing with the pattern variations!  Then it’s just the usual fitting alterations (full bust adjustment, broad back and upper arms).

Stuck with me so far?  Ready for the musings?!

The fashion fabric is going to be poly taffeta (silk is so far out of my budget, sigh).  I intend to underline it to give it a bit more body and add some strength to the seams.  Originally I intended to stop there.

Then I started having a chat with Evie who blogs at pendlestitches.  She made V2903 for her wedding dress!  She underlined hers with lawn and dress net, with the lawn closest to the duchess satin so the net didn’t leave any marks when pressing.  She also lined it!

As a result I’ve been doing lots of research on underlining.  The first 10 minutes of chapter 6 of the Couture Dress class on Craftsy has loads of useful information.  Tasia and Gertie have both posted about the use of underlining too.

I’ve realised that I need to think about what I want the final dress to look like to make sure I make the right choices for the underlinings.  Ready for a list?

Smooth appearance on panels and seams
Strong smooth seams
Crisp edges at neck, yoke and sleeve hems
Strong, smooth as I can get it, zipper insertion
Invisible seam allowances and hems
Full skirt with some structure of its own (I will be wearing a petticoat/crinoline as well)
Crisp pleats

This has led me to think that underlining with a light weight cotton (lawn, batiste, muslin, calico) in all areas of the dress, and then adding a layer of dress net to the bodice and skirt pieces only.  I’d love to use this technique where the underlining also finishes the seams.  The princess seams will be just too curvy.  Sigh.

On the subject of curvy curvyness; my FBA is going to add bigger curves to the the already curved princess seams in the bodice.  Do you think adding some bias organza strips when sewing the seam is a good idea?  There’ll be a lot of notching and clipping in that area and I don’t want the seam to be weak.  I wouldn’t cut into the organza as there should be enough flexibility in the bias for it to be able to follow the curve without any help.  Do you think this would add some strength, or am I just making my life difficult for little to no gain?

Using the dress net will make a lining somewhat essential.  There isn’t a lining pattern included so I’ll have to draft that from the pattern.  I really want to hide the ‘guts’ of the dress though so would prefer the lining doesn’t hang free inside the skirt.

Should I bag the lining to the hem (like in a lined jacket, where the lining bags down a little) or should I just use french tacks to secure it at each non-pleated seam point (4 points)?

There’s a lot of pleats in the skirt and I can imagine that when they’re all flat, there’s a fair bit of yardage, so an exact replica in lining scares me a bit due to the amount of sewing that would go into attaching the lining at the hem.  But then  I’m also not sure that a french tacked lining would work great either!  I can’t really find an answer to this anywhere, so if anyone has any resource suggestions I’d be ever so grateful!

I’ll be leaving you all in peace for a short while as we’re going on holiday in the next day or so for a week or so (heh, Husband is busy with work, so whilst we’ve booked ten days, we may have to come back after a week!).  Once I’m back it’ll be toile time as I hope to get the pattern traced and the flat pattern adjustments done before we go.  I think you’ll like the toile – it’s going to be made out of a blue stripy duvet cover!


Nautical Shirt Dress – Progress

Hello!  Sorry for the radio silence, this week has again been kinda nuts.  Several long days at the County Show, book keeping for Mr, vehicle crisis’ (or whatever the plural of crisis is – flippin’ Land Rover!) and general life has kept me from this here blog.  Fortunately for my sanity it hasn’t kept me from my sewing machine!

I don’t know if you’re aware of Sunni’s two in one sew along she’s hosting over at A Fashionable Stitch?  I’m taking part but decided to mess with the pattern to make my ideal shirt dress.

Simplicity 1880
Simplicity 2246

I’ve taken the suggested pattern Simplicity 1880 and mashed it with Simplicity 2246 – the Lisette Traveller dress.

I knew I wanted a shirt dress as soon as I saw Scruffy Badger’s red elephants version, which is a slightly tweaked 2246.  It’s such a great shape and could be a great wardrobe staple.  But, the Lisette dress isn’t my perfect shirt dress.  I wanted a faux shirt waist – one where the buttons don’t go all the way to the hem.  A lot like the 1880.  But that wasn’t perfect either!

Here’s a sketch of what I wanted:

My ‘Perfect’ Shirt Dress

A fitted bodice with bust and waist darts. A notched collar, with a skirt that’s fitted at the waist line and not gathered.  Originally I was going to use the sleeves from Mary’s Dress but when I muslined the ones from 1880 I really liked them.

So, I’ve taken the bodice from 2246, added the collar extension from 1880 and also the sleeves.  I’ve also used the 1880 skirt as it’s not gathered and there’s no buttons.  I guess it’s about a 50/50 split of elements from the two patterns.

What with combining the patterns, the FBA and muslin to make sure it all fit and then re-angling and re-positioning the darts, I started construction last weekend.  It’s not going to be the fastest thing I’ve ever made as I haven’t sewn that much recently and I’m just taking it easy.  I am really pleased with how it’s going though.

Dusky navy broderie anglaise underlined with red acetate lining.  Yum!  Dibs is currently doing something similar (although she hasn’t told us what yet) with black broderie anglaise and yellow!

Skirt hanging to let the bias settle

So far the skirt is done, the bodice darts are all sewn and the front and back are attached at the shoulders.  I’ve also sewn the pleats in the sleeves.  I’m using french seams in the main, although the neckline and left seam will be finished with purple bias binding or tonal seam tape.

Tonal or Purple?

I’d originally intended it to be self made bias from the lining fabric but I only just had enough to get all the pieces out and had to piece the underlining of the collar pieces…  I’m erring towards the seam binding though at the moment!

I hope I’ll get this done by the weekend, but we’ll have to see how it goes I guess!  I’ll do the collar the tailoring way, buy sandwiching it between the bodice and facings (which I think is the same method Sunni has planned) and I’ll also go for a lapped zipper – probably following Casey’s tutorial from her Swing Dress Sew Along.

What are you all up to?

Grey Pastille – Decisions, Decisions…

For the first time ever, I actually ordered swatches of fabric before making an online order.  Normally I’ll just take a punt on it and it’ll probably do.  I do seem to have a change in mind set though whereby rather than just seeing each garment as a learning experience that will hopefully be wearable, I now see wearable as the main goal!

This is probably how most of you sew, but as I’ve been sewing for less than a year (garment wise, anyway) I never had particularly high expectations of the finished garment.  I think it was my Sencha that has changed all that – every time I wear it, I get complimented on it and asked where I got it from.  My current response is to mumble that I made it and then make myself scarce!!

The Pastille Dress from the Colette Sewing Handbook

But, back to the point!  I would love to have a dress that I can wear to work.  Makes the whole getting dressed in the morning thing a little less of a headache.  In my mind it just means putting on a dress, tights and as sensible or silly pair of shoes as my heart desires and then off out of the door!  Pastille is in my sights for that dress.  Demure enough for the office but with an interesting neckline and pleating detail at the bottom of the skirt.

So with that in mind I went interwebs shopping as I’d got it in my head that I wanted a dark grey fabric.  I couldn’t decide and as I mentioned, my expectation have increased a wee bit.  So I ordered three swatches from Ditto fabrics.

From the Top: Wool, Linen, Cotton

The top plaid is wool
The silvery grey is 100% linen
The dark grey is 100% cotton and is the same tone as school uniform grey

The one I love best is the plaid wool.  But I have never sewn with wool before, and have no idea how to care for it.  I’m guessing that machine washing it would be a bad idea?  Can someone please give me some advice?!  I recently did a swap with Annabelle and have some gorgeous wools to use but I’m a little bit scared.  Partly because of the care issue, partly because I love the fabrics SO much I don’t want to use them and not love the finished garment (please say I’m not the only person who feels like that about bits of fabric…)  Also, would I need to line it?  Which would mean drafting a lining…  Any tips or recommendations for tutorials on that one?  I have a rough idea but would like to research the heck out of it first to make sure I was happy that I knew what I was doing!

The linen is gorgeous and I can see myself ordering some for a Rooibos and using the teal plaid I thrifted the other week for the contrast collar and piping

The dark grey cotton has a bit of stretch to it, even though it’s 100% cotton.  I think it may be due to the weave?   That’s a complete guess on my part though.  And it’ll be the easiest to look after.  Plus I kind of like school uniform grey!

So, what do you think?  My heart says the plaid wool, but I definitely need to do some more research to make sure I can look after it properly and that it’s comfortable to wear…

Inspiration – Where Do You Get Yours?

I’m really thinking about this at the moment.  For a couple of reasons; firstly because Casey asked where we got the inspiration for our circle skirts and the answers were quite eclectic.  The other reason is because I’m planning what I might wear to my brother-in-law’s wedding next September.  Yep!  Eleven (well ten and a half) months away.

Husband is going to be an Usher and Boy is going to be a Page Boy and is likely going to be in a mini morning suit (tails) with a purple waistcoat.  They haven’t made a decision yet as to whether they’d like Husband to be in morning dress yet or not.  Royal purple (or Cadbury’s purple) is the accent colour for the wedding.  I’m not an official part of the wedding party, but I’d like to incorporate a little purple into my outfit so as to co-ordinate a bit with the men in my life!

So, full on purple is out as I don’t want to look like a bridesmaid.  But an accent in my accessories would be a way of incorporating some purple.  This then led me to which other colours I’d like to wear and I have drawn on my autumn palette of purple, teal, gold, chocolate and navy.  I know that teal is very ‘now’ as a colour but it’s also a colour I love and one I am repeatedly drawn to.

 So I’ve started with something that is synonymous (at least in the UK) with weddings.  Hats!  I’m not entirely comfortable with the huge hat thing, but fascinators I can do.  Actually I love them!  The last wedding I went to was several years ago and as you can see I had a very pale colour scheme going on!

Muted Colours at a Friend's Wedding

 Ah, to be 10st something again!  I’m working on getting back there though.

I spent ages trying on hats and fascinators, eventually deciding on the one you see atop my head in the picture.  Very chic and certainly minimal in the colour department.

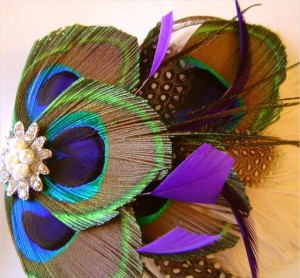
For next September though, I’ve chosen this! 

I can't wait to wear this!
Layers of texture and colour

Isn’t it fabulous?!  And the colours I love are there – the purple accent and then the teal and gold and navy in the peacock feathers.  There’s even a hint of chocolate due to the way the colours of the peacock feather change in the light.  Click on the photos to visit the Etsy shop I’ve bought it from.

This isn’t a subtle item in colour, and nor is it subtle in size!  It’s about 5” by 6” so will take up a bit of room on my head.  I plan on wearing it with a purple or teal birdcage veil which I’ll make myself.  I think it would look beautiful with a chignon, victory rolls or loose hair with a curl to it.  To be honest, what I’ll do with my hair is a whole other pondering and inspiration gathering session…  You can get veil’s like the one below on Etsy, click on the photo to go to the seller’s shop.

How I plan to style it with a birdcage veil in purple or teal

So, that’s my starting point.  I really need to decide on a dress pattern though.  But of course, I intend to make my dress!  I have absolutely no intention of wearing anything that someone else might wear, plus it gives me the opportunity to make it exactly the way I want it!  This is some of the justification in starting this whole process now.  I hope to start making my dress in June.  That would give me three months to get it done – it’s not something I want to rush!  I don’t want to rush the research or planning stages either as sometimes that’s just as much, if not more fun!

I love Colette’s Peony dress, but would want a fuller skirt.  Like Gertie’s amazing yellow dress.  In fact, something more akin to Immodesty Blaize’s nude illusion dress with the bateau neckline, three-quarter sleeves and full skirt. 

Take the skirt of Gertie's Dress...
And add Immodesty Blaize's dress bodice

A mash-up of the Peony bodice and a circle skirt will most likely give the silhouette I’m aspiring to. 

The next decision then is the fabric.  And at the moment I have no clue!  I would love to use the fabric from Gorgeous fabrics I blogged about here, but it’s just too expensive.  Sigh.  So  window/web shopping is called for – I can’t think of a better way to while away some time…

All the way from Canada!

Ooh, don't you just love post that isn't boring and gets your creativity going?

Looky looky what arrived today!  And it was only shipped on the 9th so arrived in exactly a week.  How good is that?

I’ve had a read of the Lonsdale pattern instructions and now fully understand how the front works.  I’d made it far far far more complicated in my head than it really is.  I’ll need to do a bit of grading of the pattern to get it to fit my current, but reducing, figure and this takes me a while but as the pattern pieces are so simple, it shouldn’t be too onerous.  I’m very interested to see what Tasia has come up with in the way of an FBA for this design as there’s not a lot of shaping in the bodice…  Think the bodice will deff need a muslin made as a test run.

I think I’ll use a vintage sheet for the dress if there’s enough fabric.  I’ve got the white side of a double duvet cover with large chrysanthemum type flowers printed in outline on it in shades of blue and pale beige and another which is white with turquoise flowers all over it.

In other sewing related news I’ve graded my Pendrell, done the FBA (ie added 2 1/2″ at the princess seam line – eek!), altered the neckline to be more of a V as that’s more flattering for me, done a ton of tissue fitting, retraced and cut the pattern pieces and have actually gone near some fabric!  It’s cut out, I just need to actually do some sewing…

I’m just going to make the shell to begin with (using the blue side of the chrysanthemum duvet cover) as a sort of wearable muslin – I’m intending to wear it, but if it’s a total disaster I haven’t wasted my gorgeous butterfly fabric.

Lonsdale and a Sew Along!

OK, I’m getting a little over excited over here!  The Lonsdale pattern is being shipped imminently and I can’t wait to get my paws on it!  It’s got to make it to me here in the UK from Canada, but it’ll soon be on its way – Hurrah!

And what’s even better is that there’s going to be a sewalong for the dress.  Starting the 1st of August by the sounds of it.  I haven’t actually participated in one of Tasia’s sewalongs but have read the posts for the Pendrell blouse and followed along with the crescent skirt sewalong.  Both have had all sorts of tips and tricks and techniques in them, so I’m looking forward to this as a learning experience as well as having a lovely dress by the end of it.

I'm planning view B

I’m planning on doing the maxi length, so according to the pattern envelope I’ll need 5 1/4 yards of 44″ fabric or 4 1/2 yards of 59″ fabric.

This is the one I think I’m going to go for:

Fabric for a Maxi Dress

It’s an ivory back ground with blue water colour style roses all over it.  Each rose is a little larger than a 5 pence piece, or about 6/8″ across, so a small-ish print.  It’s a poly-cotton so should be reasonably easy care.  It’s 44″ wide so I’ll need 4.8m of it but as I’ll need to grade the bodice pattern I’ll order 6m so I’ve got spare fabric should I need it.

Speaking of grading I’m working on grading the Pendrell blouse pattern up and will share my progress with you soon…  I’ve done the maths side of things, I now need to trace the pattern, slash and spread and then re-trace the sized pattern before making a muslin…  I’ll take photos as I go so you can see what I did.  Wish me luck!